Bradley Hamilton
Lakeside Painting
Why I Wrote This Guide
After 15 years painting interiors across New Zealand - from damp Wellington townhouses to sun-blasted Queenstown holiday homes - I've answered the same questions thousands of times.
What colour should I choose? Do I really need primer? Matte or low sheen? Should I just hire someone?
This guide is my attempt to put everything I know about interior painting into one place. Not the watered-down advice you get from paint company brochures, but the real stuff - including the mistakes I've made and the lessons that cost me (and my clients) real money to learn.
Whether you're planning a full house repaint, refreshing a single room, or just trying to figure out if that quote you got is reasonable, this guide will help you make better decisions.
Let's get into it.
Part 1: Understanding Paint (The Stuff Nobody Explains Properly)
What's Actually in a Tin of Paint?
Before you can choose the right paint, it helps to understand what you're buying. Every tin of paint contains four basic components:
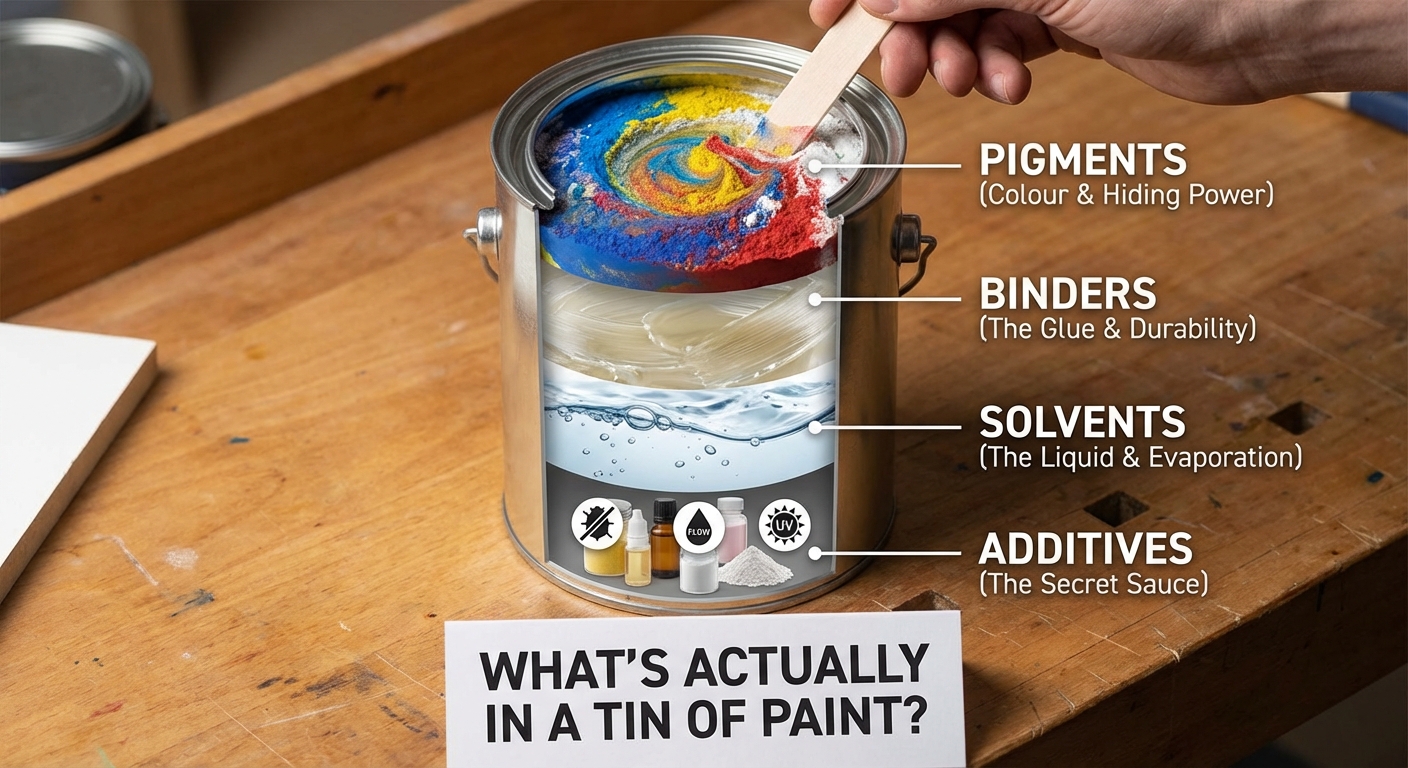
Pigments - The colour. Also provides hiding power (how well it covers what's underneath). Titanium dioxide is the main white pigment; it's why white paint costs more than you'd expect.
Binders - The "glue" that holds pigment to your wall and creates the film when paint dries. Acrylic binders are standard in modern water-based paints. Better binders = better durability = higher price.
Solvents - The liquid that keeps everything mixable. In water-based paints, this is mostly water. As paint dries, solvents evaporate (that's the smell).
Additives - The secret sauce. Anti-mould agents, flow improvers, UV stabilisers, drying accelerators. This is where premium paints justify their price.
Water-Based vs Oil-Based: The Modern Reality
Here's something that confuses a lot of people: oil-based paints are largely a thing of the past for interior walls.
Water-based (acrylic) paints now dominate for good reasons:
- Low odour (crucial when you're living in the house)
- Fast drying (recoat in 2-4 hours vs 16-24 hours)
- Easy cleanup (soap and water vs turps)
- Better colour retention (less yellowing over time)
- Lower VOCs (better for your health and the environment)
Oil-based paints still have their place:
- High-wear trim and doors (though water-based enamels have largely caught up)
- Sealing problematic stains
- Some heritage applications
For 95% of interior wall painting in New Zealand homes, you'll be using water-based paint. That's what this guide focuses on.
The Quality Spectrum: What You Actually Get for Your Money
Paint prices range from around $30 to $70+ per litre at retail (4L tins). Here's what changes as you go up:
Budget paints (~$30-35/L):
- Lower pigment concentration (needs more coats)
- Basic binders (less durable, harder to clean)
- Minimal additives
- Fine for ceilings, rentals, or areas you'll repaint soon
- Examples: Resene Ceiling Paint, Dulux Ceiling White
Mid-range paints (~$35-45/L):
- Better coverage (usually 2 coats is enough)
- Improved durability
- Decent washability
- Good choice for most rooms
- Examples: Resene SpaceCote Low Sheen, Dulux Wash&Wear
Premium paints (~$45-55/L):
- Excellent coverage (sometimes genuine one-coat)
- Superior durability and washability
- Better flow and levelling (fewer brush marks)
- Advanced additives (anti-mould, UV protection)
- Worth it for living areas, kitchens, high-traffic zones
- Examples: Resene Zylone Sheen, Dulux Wash&Wear +PLUS
Specialty paints (~$50-70+/L):
- Specific performance features (extreme washability, anti-bacterial, anti-scuff)
- Designed for wet areas and high-traffic zones
- Examples: Resene SpaceCote Kitchen & Bathroom, Dulux Wash&Wear +PLUS Kitchen & Bathroom
Trim & joinery enamels (separate category):
- Semi-gloss or gloss finish for doors, skirting, architraves, window frames
- Tougher surface than wall paints — don't use these on broadwall areas
- Examples: Resene Lustacryl, Dulux Aquanamel
Where to buy: Resene ColorShops, Bunnings, Mitre 10, or local paint specialists like Guthrie Bowron
Note: Prices based on 4L retail tins. Buying 10L pails or with a trade/DIY card will get you better per-litre rates.
My honest advice: For most Kiwi homes, mid-range to premium paint is the sweet spot. The coverage difference alone often means premium paint costs less per square metre when you factor in labour time. Cheap paint is false economy unless you're painting a rental you don't care about.
Part 2: Choosing Colours That Actually Work in New Zealand
This is where I see homeowners struggle most. Colours that look perfect on a paint chip or Pinterest board can look completely wrong on your walls. Here's why, and how to get it right.
The Kiwi Light Factor
New Zealand light is different from the Northern Hemisphere light that most international design content assumes. We're closer to the equator, our atmosphere is cleaner, and our light is more intense and slightly bluer.
This means:
- Colours appear more saturated than in the UK or Northern Europe
- Cool colours can look colder than expected
- Warm colours don't go as muddy
- What works in a London interior might feel harsh here
North-facing rooms get consistent, warm light throughout the day. These rooms are forgiving - most colours work well. You can go cooler (greens, blues, greys) without the room feeling cold.
South-facing rooms get cool, indirect light. Warm it up with cream, warm whites, soft yellows, or warm greys. Avoid anything with blue or green undertones unless you want a chilly feel.
East-facing rooms get warm morning light, then cool off in the afternoon. Versatile spaces - most colours work, but test samples in afternoon light to avoid surprises.
West-facing rooms get intense afternoon sun. Be careful with bright or saturated colours - they can become overwhelming. Also consider UV-resistant paints for furniture protection.
For a deeper dive into colour selection for different room orientations, check out my guide on choosing interior colour schemes for New Zealand homes.
The Undertone Trap
Every "neutral" has an undertone. That grey you love? It's probably got blue, green, purple, or brown hiding in it. That white? Could lean pink, yellow, blue, or green.
Here's how to spot undertones:
- Hold the colour chip against a pure white piece of paper
- Compare it to other colours in the same family
- Look at it in different lighting conditions
- The undertone that bothers you in one light will bother you more on four walls
Common undertone issues I fix:
- Grey with purple undertone looking "bruised"
- White with pink undertone feeling "fleshy"
- Beige with yellow undertone going "nicotine stain"
- Grey with green undertone looking "minty" or "hospital"
The Sample Process (Non-Negotiable)
Never, ever commit to a colour without sampling it on your actual walls. Here's my process:
- Get A5-size samples minimum - Those tiny swatches are useless
- Paint samples on multiple walls - Light hits differently on each surface
- Paint over white primer patches - Not directly on existing colours
- Live with samples for at least a week - Check morning, noon, evening, and artificial light
- Check against your fixed elements - Flooring, tiles, curtains, furniture you're keeping
Resene does testpots. Dulux does A4 peel-and-stick samples. Both work. The $10-15 you spend on samples saves the $500+ mistake of painting an entire room in the wrong colour.
Safe Colour Choices That Work Almost Everywhere
If you're paralysed by choice or painting to sell, these colour families rarely go wrong in NZ homes:
Warm whites: Resene Quarter Rice Cake, Dulux Natural White, Resene Half Sea Fog Cool whites: Resene Black White, Dulux Lexicon Quarter Warm greys: Resene Triple Truffle, Dulux Tranquil Retreat Cool greys: Resene Half Stack, Dulux Flooded Gum Greiges: Resene Half Bison Hide, Dulux Limed White
Part 3: Understanding Sheens (This Matters More Than You Think)
The sheen (glossiness) of your paint affects how the room looks, how durable the finish is, and how easy it is to maintain. Get this wrong and you'll regret it.
The Sheen Spectrum Explained
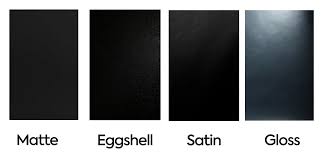
Flat/Matte - No shine at all. Absorbs light, hides imperfections beautifully. But marks easily and is hard to clean. Think of it as high-maintenance beauty.
Low Sheen - Slight velvety appearance. The Kiwi default for good reason - it's the sweet spot between hiding imperfections and being wipeable.
Satin/Eggshell - Noticeable soft sheen. More durable and washable than low sheen, but shows wall imperfections more readily.
Semi-Gloss - Obvious shine. Very durable and easy to clean. Usually reserved for trim, doors, and wet areas.
Gloss - High shine, mirror-like. Maximum durability but shows every flaw. Mainly for trim and features.
The Room-by-Room Guide
Living rooms: Low sheen on walls, semi-gloss on trim Bedrooms: Flat or low sheen (your call on maintenance vs aesthetics) Kitchens: Low sheen minimum, satin better for splashback-adjacent walls Bathrooms: Satin or semi-gloss for moisture resistance Hallways: Low sheen or satin (durability matters in high-traffic areas) Kids' rooms: Satin (you'll thank me when crayons happen) Ceilings: Flat (hides imperfections, no glare) Trim/doors/skirting: Semi-gloss or gloss
For the full breakdown including specific product recommendations, see my detailed guide on choosing between gloss, matte, and low sheen. I've also written about the sheen spectrum if you want even more detail.
The Consistency Rule
Here's something that catches people out: keep sheen levels consistent within sightlines.
If your living room is low sheen and your hallway is satin, the difference will be noticeable where they meet. It looks like a mistake, even if both finishes are technically appropriate for their spaces.
Pick one sheen for all walls in connected areas. Trim can (and should) be different.
Part 4: Preparation (Where 80% of Paint Jobs Are Won or Lost)
I say this to every client: preparation is 80% of a quality paint job. You can use the best paint in the world, but if your prep is rubbish, the result will be rubbish.
Assessing Your Walls
Before you do anything, understand what you're working with:
Check for damage:
- Holes (nail pops, picture hooks, accidental damage)
- Cracks (hairline, structural, or movement cracks)
- Dents and dings
- Water damage or staining
- Mould or mildew
Check the existing paint:
- Is it firmly adhered? (Do the tape test - press masking tape firmly, pull off sharply. If paint comes with it, you have adhesion problems)
- Is it chalking? (Rub your hand on it - white residue means the paint is breaking down)
- Is it the right base for your new paint? (Water-based over oil-based needs special treatment)
The Preparation Steps (In Order)
Step 1: Clear and protect
- Move furniture to the centre of the room and cover with drop sheets
- Remove switch plates and outlet covers
- Tape off areas you're not painting (or remove tape and cut in by hand - I prefer cutting in)
- Lay drop sheets on floors, taped at edges

Step 2: Clean
- Dust walls with a soft brush or vacuum with brush attachment
- Wash with sugar soap solution (especially kitchens and bathrooms)
- Rinse with clean water
- Let dry completely (24 hours in humid conditions)
Step 3: Repair
- Fill all holes with appropriate filler (lightweight for small holes, setting compound for larger repairs)
- Tape and mud any cracks (see how to fix wall cracks properly; for cracks that might move, use flexible filler)
- Let dry completely
- Sand smooth (120-grit then 180-grit)
- Dust off
Step 4: Sand
- Even if walls look fine, a light sand with 180-grit creates tooth for paint to grip
- Use a pole sander for large areas
- Wipe down with a damp cloth to remove all dust
Step 5: Prime (when needed)
You need primer when:
- Painting over new or bare gib board
- Covering stains (water marks, smoke, marker pen)
- Painting over oil-based paint with water-based paint
- Dramatic colour changes (dark to light)
- Walls have varying porosity (patched areas vs existing paint)
You can skip primer when:
- Repainting over sound, clean, similar-coloured paint
- Using premium paint with built-in primer on walls in good condition
For a deep dive on primer selection, see my guide on picking the right primer for New Zealand conditions.
The Mistakes That'll Haunt You
Skipping the sugar soap wash: Grease, dust, and grime prevent paint adhesion. I've seen entire paint jobs fail because someone couldn't be bothered washing the walls.
Painting over damp: Paint needs a dry surface. In our humid climate, especially in bathrooms and kitchens, this means proper ventilation and patience.
Not fixing cracks properly: Paint over a crack without addressing it, and you'll see it through your fresh paint within months. Use the right tape and compound.
Insufficient sanding between coats: Each coat needs tooth for the next coat to grip. A quick sand with 220-grit between coats makes a significant difference to the final result.
For everything you’ll need to sand between coats for a flawless finish, this short article has it all: The 10-Minute Step That Separates Good Paint Jobs from Great Ones.
Part 5: The Painting Process (Technique That Gets Results)
You've prepped properly. You've got your paint. Now let's talk about actually putting paint on walls like a professional.
Tools That Make the Difference
Brushes:
Choosing the right brush makes cutting in faster and cleaner. You'll typically need a few different sizes and types to complete an interior paint job properly.
Brush types explained:
- Wall brushes – Best for broad strokes on larger areas. The thicker bristles hold more paint and create longer, smoother strokes. Great for painting the body of doors, panels, and anywhere you need coverage.
- Sash cutters – A full-bodied cutting-in brush, ideal for water-based paints. These are your workhorse for most interior cutting-in work.
- Oval cutters – Provide greater control and accuracy along edges. The oval shape gives you a finer tip to work with.
- Angle cutters – Angled at the head, allowing you to cut sharper, more precise lines. My go-to for ceiling lines and tight corners.
- Lining fitches – Thin brushes with stiff bristles for hard-to-reach spots. Perfect for window glazing bars, decorative mouldings, and achieving crisp straight lines.
Brush sizes and what they're best for:
- 25mm – Touch-ups, small timber trim, fiddly bits
- 38mm – Window frames, mouldings, narrow skirting
- 50mm – The all-rounder. Doors, cabinets, cutting in along ceilings and corners
- 63mm – Wider skirting boards, architraves, cupboard doors
- 75mm – Fascias, floor boards, larger flat areas where you're brushing (not rolling)
- 100mm – Only if you're brushing large areas like ceilings or feature walls (rare for most DIYers)
For most NZ interior jobs, a 50mm angled brush for cutting in and a 63mm for trim will cover 90% of what you need.
My personal brush recommendations:
I've tried most of the brushes available in New Zealand, and two brands stand out for me.
For everyday cutting in and general work, I use Maverick brushes. The bristles are super soft, they hold paint really well, and it's easy to cut neat lines with them. They also keep their shape longer than most brushes I've used in NZ – which matters when you're painting every day.
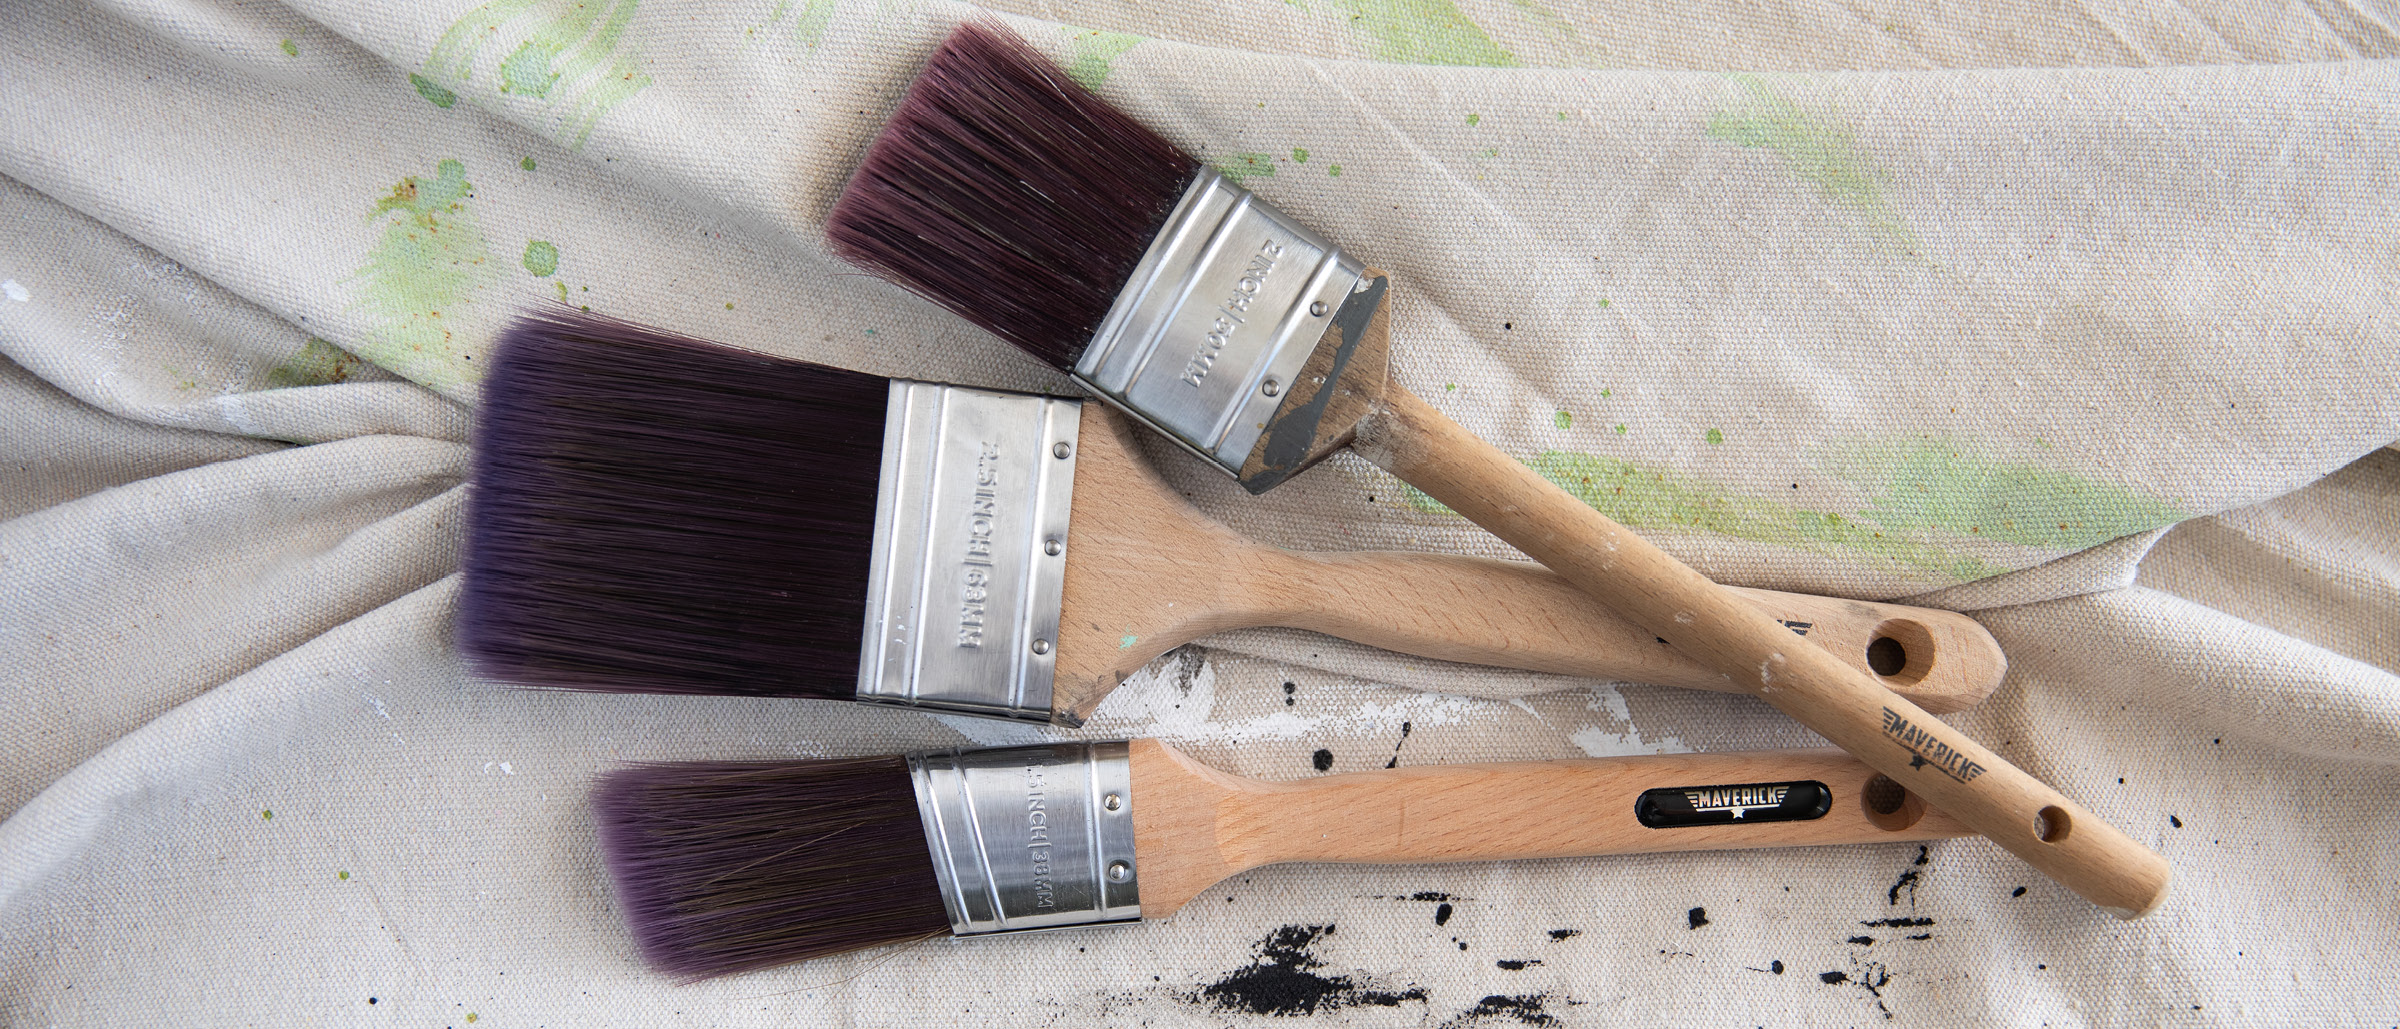
For feature walls or anywhere that requires very precise cutting (like dark paint against white ceilings), I reach for the Monarch angled brush. The angle and bristle quality give you that extra bit of control when precision really matters.
Don't cheap out on brushes. Quality brushes hold more paint, release it evenly, and don't shed bristles into your finish. A good brush also makes the actual painting more enjoyable – you're not fighting the tool.
For a deeper dive into bristle types, brush care, and what to look for when buying, see my full guide: How to Pick the Right Paint Brush (And Stop Wasting Money on the Wrong Ones).
Mini Rollers:
Here's a technique most DIYers don't know about: use a mini roller behind your brush work.
When you cut in with a brush, you leave brush marks – tiny ridges and texture from the bristles. On their own, these are usually fine and blend in once the main wall is rolled. But for a truly flawless finish, I follow my brush work with a small foam or microfibre mini roller. It smooths out those brush marks and blends the cut-in area seamlessly with the rolled section.
How to do it:
- Cut in a section (about 1 metre) with your brush
- While it's still wet, go over the brushed area with a mini roller using light pressure
- Roll out towards where you'll be rolling the main wall
- Continue cutting in and mini-rolling in sections
This takes a bit longer, but the difference in finish quality is noticeable – especially in good light or with higher sheen paints.
Mini roller types:
- Foam mini rollers – Best for smooth surfaces and gloss/semi-gloss paints. They leave an incredibly smooth finish but can create bubbles if you roll too fast. Use light, even pressure.
- Microfibre mini rollers – More forgiving than foam. Good for walls with slight texture and work well with low-sheen paints. My pick for most interior wall work.
- Mohair mini rollers – Premium option for doors and trim. Ultra-smooth finish, excellent for enamel paints.
For most interior walls in NZ (painted with low-sheen water-based paint), a 100mm microfibre mini roller is ideal for this technique.
Rollers:
- 270mm roller for walls
- 180mm for ceilings (less tiring)
- 100mm for tight spots
- 10mm nap for smooth walls (most NZ interiors)
- 12-15mm nap for textured surfaces
Other essentials:
- Roller tray (not a paint pot - trays give better loading)
- Extension pole (1.2m-2.4m adjustable)
- Step ladder
- Painter's tape (if you're not confident cutting in)
- Rags and water bucket for spills
The Cutting-In Technique
"Cutting in" means painting edges and corners with a brush before rolling. Done well, it eliminates the need for tape and gives a cleaner finish.
My technique:
- Load brush by dipping halfway into paint
- Tap (don't wipe) excess on inside of can
- Apply paint in a strip about 50-75mm wide along edges
- Work in sections of about 1 metre
- Keep a wet edge - the brush work needs to still be wet when you roll
The key is confidence and consistency. Don't overwork the paint. Two smooth strokes beat ten fiddly ones.
For more on this technique, including when spray painting makes sense, see my guide on spray vs brush and roll.
The Rolling Technique
Loading:
- Pour paint into tray reservoir
- Roll into paint, then roll on the tray slope to distribute evenly
- The roller should be loaded but not dripping
Application:
- Start with a "W" or "M" pattern on the wall (spreads paint initially)
- Roll out in vertical strokes, overlapping each pass by 50%
- Work in sections of about 1 square metre
- Keep a wet edge - don't let one section dry before you roll the adjacent area
- Finish with light vertical strokes (this is "laying off" - smooths the finish)
The Rules:
- Don't press too hard (creates roller marks)
- Don't go too fast (creates spattering)
- Don't overwork paint that's starting to dry (creates texture)
- Maintain consistent pressure throughout
Ceilings: The Overlooked Surface
Ceilings are often neglected, but a yellowed or stained ceiling drags down an entire room.
Ceiling-specific tips:
- Use flat paint (no glare, hides imperfections)
- Work perpendicular to the main light source
- Use a shorter roller (less arm fatigue)
- Accept you'll need a sore neck - there's no way around it
- Two thin coats beat one thick coat
Drying and Recoating
Between coats:
- Wait for the paint to be fully dry to touch (usually 2-4 hours for water-based)
- Light sand with 220-grit to remove any nibs or dust particles
- Wipe with a damp cloth
- Apply next coat
After final coat:
- Let cure for 24-48 hours before hanging pictures or moving furniture back
- Let cure for 1-2 weeks before washing (even "washable" paint needs time to fully harden)
Common Painting Problems and Fixes
Lap marks (visible lines where wet and dry paint meet):
- Cause: Working too slowly, edges dried before overlapping
- Fix: Work faster, maintain wet edge, in hot weather add Floetrol
Roller marks/texture:
- Cause: Too much pressure, paint too thick, wrong nap length
- Fix: Light pressure, thin paint slightly if needed, use appropriate roller
Brush marks:
- Cause: Overworking paint, cheap brushes, paint drying too fast
- Fix: Fewer strokes, quality brushes, add conditioner in hot weather
Drips and sags:
- Cause: Too much paint applied, paint too thin
- Fix: Better loading technique, check paint consistency
Poor coverage:
- Cause: Insufficient paint, spreading too thin, inadequate stirring
- Fix: More paint per coat, proper stirring, potentially add another coat
Part 6: Room-by-Room Considerations
Different rooms have different demands. Here's what to think about for each space.
Living Areas
The rooms where you spend most time and where guests form impressions.
Priorities:
- Colour that works in natural and artificial light
- Durable finish for high-traffic areas
- Washability for inevitable marks
Recommendations:
- Low sheen or satin on walls
- Semi-gloss on trim
- Premium paint (you look at these walls every day)
- Neutral colours for longevity, feature walls for personality
Kitchens
Steam, grease, and frequent cleaning demand special attention.
Priorities:
- Moisture resistance
- Grease resistance
- Washability/scrubbability
- Mould resistance
Recommendations:
- Satin or semi-gloss minimum (low sheen in dining areas OK)
- Kitchen-specific paint if budget allows
- Light colours show grease less (but show more easily)
- Semi-gloss on ceiling above cooking areas
Bathrooms
The most demanding environment in your home.
Priorities:
- Extreme moisture resistance
- Mould and mildew resistance
- Easy to clean
- Durability despite humidity cycling
Recommendations:
- Bathroom-specific paint with anti-mould additives
- Satin or semi-gloss
- Good ventilation is essential (paint won't fix underlying moisture problems)
- Light sand and repaint every 5-7 years in high-use bathrooms
Bedrooms
Personal spaces where aesthetics often trump durability.
Priorities:
- Colour you can live with (you see it first and last each day)
- Restful atmosphere
- Reasonable durability in kids' rooms
Recommendations:
- Flat or low sheen (flat shows less but marks more)
- Softer colours for relaxation
- In kids' rooms: satin finish for washability
- Consider ceiling colour (white can feel institutional in bedrooms)
Hallways and Stairs
High-traffic zones that take a beating.
Priorities:
- Durability
- Touch-up ability
- Scuff and mark resistance
Recommendations:
- Low sheen or satin
- Mid-toned colours (hide marks better than white)
- Keep spare paint for touch-ups
- Semi-gloss on trim at contact height
Home Offices
Where you spend working hours needs to support productivity.
Priorities:
- Colour that doesn't cause eye strain on video calls
- Good backdrop for cameras (if working from home)
- Professional appearance
Recommendations:
- Avoid colours that reflect oddly on screens
- Test with webcam if you do video calls
- Neutral colours keep focus on you, not your walls
Part 7: The DIY vs Professional Decision
This is the question I get asked most: should I do it myself or hire someone?
The honest answer: it depends. Let me help you figure it out.
When DIY Makes Sense
You should DIY if:
- It's a single room in reasonable condition
- You have a full weekend (minimum) available
- You're not afraid of heights (for ceilings)
- You genuinely enjoy this kind of work
- The stakes are low (rental, room you rarely use)
- Budget is genuinely tight
DIY works well for:
- Single bedrooms
- Feature walls
- Touch-ups and maintenance
- Low ceilings
- Walls in good condition
When to Hire a Professional
Hire a pro if:
- It's multiple rooms or the whole house
- Walls need significant repair
- There's lead paint (pre-1970s homes)
- High ceilings or stairwells are involved
- You're painting to sell (first impressions matter)
- Your time is worth more than the cost difference
- You want a guaranteed result
Pros are worth it for:
- Living areas and kitchens (the rooms that matter most)
- Ceilings (harder than they look, and exhausting)
- Anywhere you need scaffolding
- Colour-matched touch-ups that blend invisibly
- Meeting deadlines (pre-sale, before guests arrive)
The Real Cost Comparison
Let's do the maths for a typical 3-bedroom house interior:
DIY costs:
- Paint and primer: $800-1,200
- Tools and supplies: $200-400 (if you don't have them)
- Your time: 60-100 hours
- Total materials: ~$1,000-1,600
Professional costs:
- Full interior repaint: $4,000-8,000 (depends on condition and region)
- Includes: labour, materials, expertise, guarantee
- Your time: Zero
The dollar difference looks significant. But consider:
- 60-100 hours at minimum wage ($23.15) = $1,389-2,315 value of your time
- Professionals do it in 5-7 days with a team
- Mistakes cost money to fix
- Professional results add property value
For a detailed breakdown with real numbers, see my guide on DIY vs hiring a professional painter.
Finding Good Painters
If you decide to hire, here's how to find someone who won't let you down:
Get multiple quotes (minimum three):
- Compare like with like (same prep work, same paint quality)
- Be suspicious of quotes significantly lower than others
- Ask what's included (moving furniture? Number of coats? Warranty?)
Check credentials:
- Insurance (public liability minimum)
- References (actually call them)
- Photos of recent work
- Clear communication
Warning signs:
- Wants full payment upfront
- Cash only
- No written quote
- Can't provide references
- Pressure tactics
For my full guide on finding and vetting painters, see 10 essential questions to ask your painter before hiring. If you're in the Queenstown Lakes area, I've also put together recommendations for local home services including trusted painters.
Part 8: Maintaining Your Paint Job
A quality paint job should last 7-15 years depending on the room. Here's how to protect your investment.
Regular Maintenance
Annually:
- Dust walls with a soft brush or vacuum attachment (yes, walls get dusty)
- Check for any developing issues (cracks, peeling, mould)
- Wipe down high-touch areas (around light switches, door frames)
As needed:
- Spot clean marks with damp cloth and mild detergent
- Touch up small chips or scratches (keep leftover paint!)
- Address any moisture issues immediately
Touch-Up Technique
Touching up without visible patches is an art:
- Same paint, same batch - Different batches vary slightly. Keep your leftover paint.
- Feather the edges - Don't paint a square patch. Blend edges outward.
- Same application method - If walls were rolled, touch up with a small roller, not a brush.
- Thin coats - Multiple thin touch-ups blend better than one thick one.
- Accept imperfection - Old paint oxidises. Touched-up spots may never perfectly match.
When to Repaint
Signs it's time:
- Widespread chalking (paint rubbing off on your hand)
- Peeling or flaking (see my guide on fixing peeling or bubbling paint)
- Fading (especially in sunny rooms)
- Stains that won't clean
- General wear that touch-ups can't fix
- You're simply tired of the colour
Average lifespans:
- Bedrooms: 10-15 years
- Living areas: 7-10 years
- Kitchens: 5-7 years
- Bathrooms: 5-7 years
- Hallways: 5-10 years
- Ceilings: 10-15 years
Part 9: Special Situations
Painting Over Dark Colours
Going from dark to light is one of the trickiest paint jobs.
The approach:
- Clean thoroughly (dark paints show every imperfection, so they were probably applied carefully - good news)
- Apply stain-blocking primer (grey-tinted primer is better under white than white primer)
- Expect 3 coats minimum
- Consider tinted primer matched to your final colour
Painting Feature Walls
Feature walls can make or break a room.
Tips:
- Choose the wall you see when entering (not the one behind the TV)
- Don't choose the wall with the most windows
- One shade darker or brighter than other walls keeps things cohesive
- Bold patterns and colours need confident application
If you're considering wallpaper for your feature wall instead of paint, see my guide on why wallpaper is making a comeback in New Zealand homes.
Painting Over Wallpaper (Don't)
I know, I know. Removing wallpaper is hard work. But painting over it is storing up problems:
- Moisture from paint can release wallpaper adhesive
- Seams will telegraph through
- You're building a house of cards
If you absolutely must:
- Ensure wallpaper is firmly adhered everywhere
- Stick down any loose edges with wallpaper adhesive
- Use oil-based primer (water-based can reactivate the glue)
- Accept you'll probably need to deal with it properly eventually
For the proper approach, see how to prep walls for wallpaper and the complete guide to wallpaper in New Zealand.
Painting Rental Properties
Different priorities for landlords:
- Durability over aesthetics
- Neutral colours (tenant preference varies)
- Mid-range paint (balance of cost and longevity)
- Consistent colours throughout (easier touch-ups)
- Consider low-sheen for tenant-proof washability
Part 10: Saving Money Without Cutting Corners
Paint projects can get expensive. Here's how to reduce costs without compromising results.
Smart Savings
Paint selection:
- Buy during sales (winter sales can save 30%+)
- Join trade clubs (Resene and Dulux offer discounts to anyone)
- Use premium where it matters (living areas), budget where it doesn't (closets)
- Consider tinted ceilings - pure white ceiling paint is cheaper than coloured
Tools:
- Buy quality brushes and rollers once, clean them properly, they'll last years
- Share or borrow equipment (scaffolding, extension poles)
- Hire specialist equipment rather than buy (sprayers, industrial scaffolding)
Process:
- Do your own prep work, hire pros for painting only
- Paint multiple rooms at once (bulk paint is cheaper)
- Plan properly to avoid re-buying supplies
Timing:
- Book painters in their quiet season (autumn/winter for interiors)
- Be flexible on start dates for better pricing
For more cost-saving strategies, see my detailed guide on smart ways to slash painting costs without sacrificing quality.
False Economies to Avoid
Don't do these:
- Buy the cheapest paint (you'll need more coats, it won't last)
- Skip primer where it's needed (adhesion problems cost more to fix)
- Rush preparation (paint fails on poorly prepared surfaces)
- Use old, partially-dried paint (inconsistent results)
- Hire unlicensed, uninsured painters (if something goes wrong, you pay)
Part 11: Your Interior Painting Checklist
Here's everything in one checklist you can print and follow:
Planning Phase
- Assess wall condition throughout house
- Identify any issues needing repair (cracks, holes, damp, mould)
- Decide which rooms to paint
- Set realistic budget
- Decide DIY vs professional
- Research colours (get inspiration, consider light, existing elements)
- Order samples
- Test samples on walls for at least 3 days
- Calculate paint quantities
- Purchase paint and supplies
Preparation Phase
- Clear room (furniture to centre, cover with drop sheets)
- Remove switch plates and outlet covers
- Protect floors with drop sheets
- Dust walls
- Wash walls with sugar soap
- Rinse with clean water
- Let dry 24 hours
- Fill all holes and cracks
- Let filler dry
- Sand filler smooth
- Light sand all walls
- Wipe down to remove dust
- Apply primer where needed
- Let primer dry
Painting Phase
- Stir paint thoroughly
- Cut in ceiling edges
- Roll ceiling
- Let dry, apply second coat if needed
- Cut in wall edges
- Roll walls
- Let dry 2-4 hours
- Light sand any imperfections
- Apply second coat
- Paint trim (doors, skirting, architraves)
- Remove tape while paint is still tacky
- Touch up any mistakes
Finishing Phase
- Let cure 24-48 hours before furniture
- Reinstall switch plates and outlet covers
- Clean tools immediately
- Store leftover paint properly (labelled, sealed, cool dark place)
- Note batch numbers and colours for future reference
Part 12: Your Next Steps
If you've read this far, you're serious about getting your interior painting right. Here's how to move forward:
If You're DIYing
- Start with preparation - It's tempting to jump to painting, but prep is everything
- Do one room first - Get your technique down before tackling the whole house
- Take your time - Rushing causes mistakes that take longer to fix
- Keep this guide handy - Refer back when you hit problems
If You're Hiring
- Get at least three quotes - Compare apples with apples
- Ask the right questions
- Check references - Actually call them
- Get everything in writing - What's included, what's not, timeline, warranty
Related Guides on Kiwi Painting Tips
Colour and finish selection:
- Choosing the Best Interior Colour Schemes for New Zealand Homes
- Gloss vs Matte vs Low Sheen: Which Paint Finish Is Best for Each Room?
- The Sheen Spectrum: When to Choose Matte, Low Sheen, or Gloss
Preparation and technique:
- A Kiwi's Guide to Picking the Right Primer
- Spray or Brush and Roll: 15 Years of Hard-Won Wisdom
- The Kiwi Guide to Sorting Out Peeling or Bubbling Paint
Costs and decisions:
- DIY or Hire a Pro? The Honest Cost Breakdown
- 10 Smart Ways to Slash Painting Costs Without Sacrificing Quality
- 10 Essential Questions to Ask Your Painter Before Hiring
- The $2K Paint Job That Adds $15K to Your Home's Value
Wallpaper (when paint isn't the answer):
- Feature Walls in 2025: Why Wallpaper is Making a Comeback
- The Complete Kiwi Guide to Wallpaper
- How to Prep Your Walls for Wallpaper
- Painted Over Wallpaper? Here's How to Fix It
Future guides coming soon:
- Room-by-Room Painting Guide for New Zealand Homes
- The Complete Guide to Painting Ceilings
- How to Paint a Door Like a Professional
- Choosing Paint Colours for Small Spaces
- Paint Colour Trends in New Zealand (Updated Annually)
Final Thoughts
Interior painting is one of the most transformative things you can do to a home. It's also one of the most accessible - with proper preparation and technique, anyone can achieve professional-looking results.
The key is taking it seriously. Not because it's complicated, but because the details matter. The extra hour spent on prep, the right primer in the right place, the patience to let things dry properly - these are what separate a paint job you'll love for a decade from one you'll regret in a year.
Whether you pick up a brush yourself or hire someone to do it for you, I hope this guide helps you make better decisions and get better results.
And if you're in Central Otago and need a hand? You know where to find me.
Happy painting.
Brad Hamilton Kiwi Painting Tips
Looking for professional painters in Central Otago? Painters Wanaka provides professional interior painting with deep knowledge of local conditions and understands what it takes to achieve lasting results in New Zealand homes.
The author also runs lakeside painting, a professional painting company serving the Central Otago region.

About the Author
Bradley Hamilton
Bradley Hamilton has spent over 15 years painting homes across New Zealand, from Auckland villas to Queenstown alpine retreats. Now based in Central Otago, he combines hands-on trade experience with a passion for helping Kiwi homeowners get professional results - whether they're picking up a brush themselves or hiring a pro.
Comments
Join the conversation by signing in
No comments yet.
Be the first to share your thoughts!